Disconnect switches are highly significant in ensuring electrical safety, by providing a quick and easy way to cut power to a circuit during an emergency or maintenance.
Read this article to learn everything you need to know about wiring a disconnect switch yourself! It’s easy and simple!
What is a Disconnect Switch?
A Disconnect Switch is a mechanical device used to isolate a circuit from its power source.
They are generally used in both residential and commercial settings to facilitate a safe and convenient way to cut power to a circuit during maintenance or an emergency.
Why It's Important To Wire A Disconnect Switch Correctly
Disconnect Switches are indispensable safety devices, and it is imperative to wire them correctly to ensure proper safety and functionality.
Here are a few other reasons why it’s important to wire a disconnect switch properly.
Compliance
Most jurisdictions contain electrical codes requiring disconnect switches to be wired correctly, and failure to do so results in fines and penalties.
Reliability
Disconnect switches are less likely to fail if they’re wired properly. This makes the circuit more reliable and safer to use.
Fire Hazard
Disconnect switches are quick to cut power to the circuit following a circuit overload, preventing a fire from starting.
Durability
Proper wiring allows a disconnect switch to last longer than one that is wired incorrectly.
Prevent Electric Shocks
The inability to wire a disconnect switch can often lead to partial isolation of the circuit from its power source, resulting in undesirable electrical shocks.
Tools Necessary To Wire a Disconnect Switch
Here’s a list of tools & materials you’ll require to wire a disconnect switch all by yourself.
Safety Glasses
Gloves
Wire Strippers
A Disconnect Switch
Electrical Tape
A Screwdriver
A Drill (if necessary)
Steps To Wiring A Disconnect Switch
Turn off power to the circuit by turning off the circuit breaker at the main electrical panel.
Identify the hot and neutral wires. The hot wire is typically black, red, or copper-colored. The neutral wire is typically white.
Strip the insulation off the ends of the hot and neutral wires. Be careful not to overstrip the wires, as this could damage them.
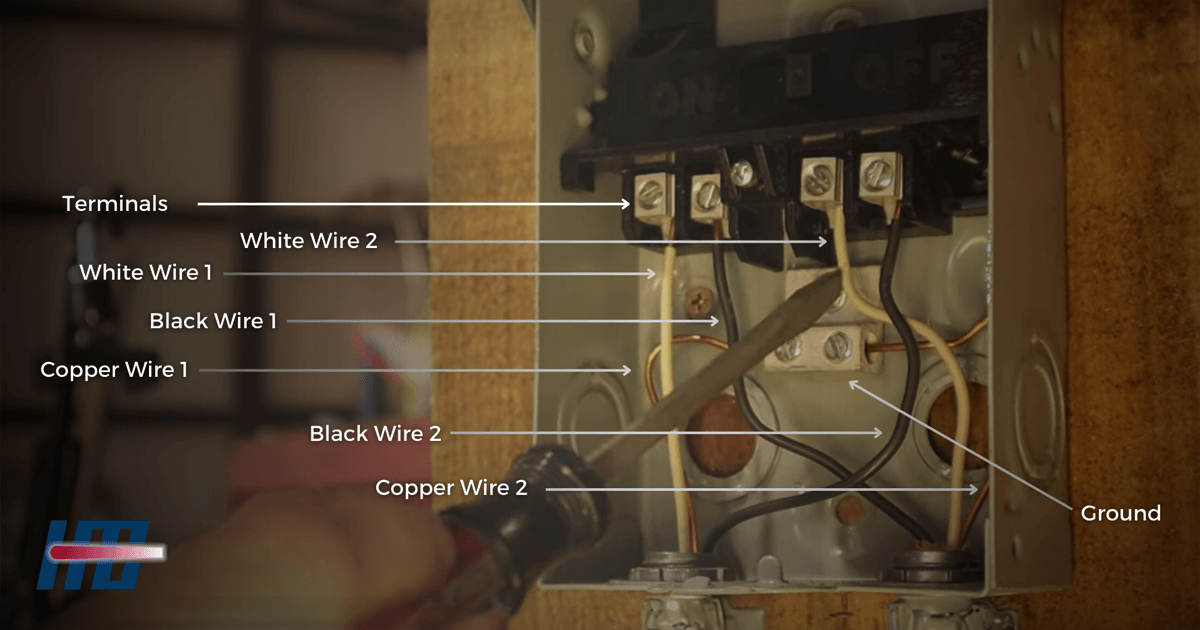
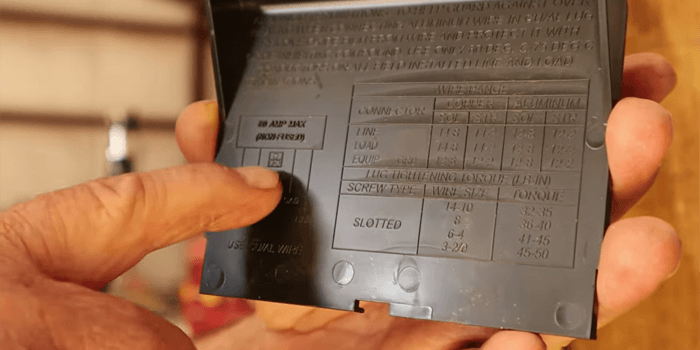
Connect the hot and neutral wires to the disconnect switch. (Check the instructions provided below or read the instructions provided on the lid of your disconnect switch.)
Take the ground wires/neutral wires (copper wires) and screw them tightly to the ground block; connect the left copper wire to the left block and the right copper wire to the right block.
Connect the left neutral wire (white) to the leftmost line terminal (1st terminal).
Connect the left hot wire (black/red) to the rightmost line terminal (4th terminal).
Connect the left neutral wire (white) to the left load terminal (2nd terminal).
Connect the left hot wire (black/red) to the right load terminal (3rd terminal).
Turn on the power to the circuit and test the disconnect switch, ensuring that the disconnect switch turns the power off to the circuit when it is in the “off” position.
Things to Keep in Consideration
When wiring a disconnect switch for a 240-volt circuit, you will need to connect both hot wires to the disconnect switch.
If you are wiring a disconnect switch for a circuit that is protected by a fuse, make sure to install the fuse before turning on the power to the circuit.
If you are wiring a disconnect switch for an outdoor circuit, make sure to use a weatherproof disconnect switch.
Conclusion
Wiring a disconnect switch is an easy task, but make sure to follow the instructions carefully to ensure that the switch is wired properly.